This guide is for you, if:
- You are a data scientist and want to quickly publish a training or scoring function to your peers with a plumber API.
- Your IT demands, that connections should be encrypted and password protected.
- You are familiar with docker containers.
- You are lazy and do not want to dive in the technical details of dealing with nginx or another reverse proxy
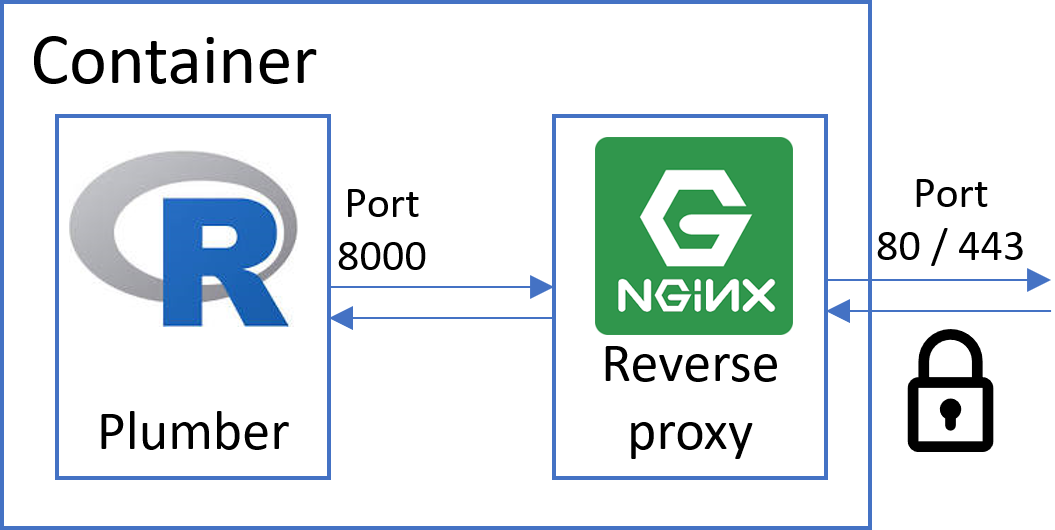
The open-source deployment framework AHUB has undergone a major rework, making it now even easier to setup a secured R based API deployment in seconds. The only pre-requisite is, that you have built a docker container image with your plumber app listening on port 8000. If you need help doing so, please refer to this tutorial.
![]()
AHUB is a framework for deploying analytical applications inside docker containers using Docker swarm.
The framework aims at providing a unified approach to run scripts in any language (R, Python, etc…) while offering common services for most deployment scenarios:
- a graphical user interface
- access control (via Basic Authentication, Active Directory or Cloud Identity Providers)
- process management and logging functionality
- easy scalability
Docker swarm is able to run a collection of containers simultaneously such that they can communicate with each other over a shared virtual network. Docker swarm has a multitude of features which makes it a powerful tool even in large scale deployment. AHUB provides a pre-configured swarm setup to deploy containers (based on R or any other language) with minimal effort.
Get started….
Clone the AHUB repo (https://github.com/qunis/ahub) to a folder of your choice.
Generating user credentials
For using the simple configuration with HTTP Basic Authentication AHUB comes with a pre-generated password file (username ahub, password ilikebigwhales). But of course you want to create your own. All you need to do is run the following command in your cloned folder (please fill in your username and password). This will create a .htpasswd file containing the MD5 hashed credentials for your user.
docker run --mount type=bind,src=$pwd,dst=/var qunis/htpasswd <username> <password>
Configuring the stack
Docker swarm operates with a recipe, telling it which containers to spin up, which ports to publish, which volumes to mount, et cetera. Everything you would normally configure in a single „docker run …“ statement for a singular container instance, we write down in the so called Compose file instead when working with docker swarm. For a more detailed introduction see here.
Please inspect the demo compose file in the main folder:
version: '3.3'
services:

# -------------------------------------------
# NODE STACK (add analytical modules here)
# -------------------------------------------
# For compatibility with AHUB, container images
# need to comply with the following:
# - publish a REST API on port 8000
# - provide a swagger.json file in the "/" path (if you want to use the GUI)
# -------------------------------------------

  node1:
    image: qunis/ahub_rnode:2.0  # this is a demo container showcasing the R package ahubr

# -------------------------------------------

  node2:
    image: qunis/plumberdemo  # this is a demo container showcasing R plumber

# -------------------------------------------

  node3:
    image: qunis/prophetdemo  # this is a demo container showcasing Facebook's prophet

# -------------------------------------------
# SERVICE STACK (DO NOT TOUCH)
# -------------------------------------------

  boss:
    image: qunis/ahub_boss:2.0
    volumes:
      - "/var/run/docker.sock:/var/run/docker.sock"
    configs:
      - source: main_config
        target: /app/config.yaml

# -------------------------------------------
# CONFIGS & SECRETS
# -------------------------------------------

configs:
  main_config:
    file: ./config.yaml

secrets:
  htpasswd:
    file: ./.htpasswd
The first block defines the node stack. Here you can add as many container images as you like or exchange the existing ones. For compatibility with AHUB it is only required that plumber (or any other API) publishes on port 8000 and provides the Swagger definition file (if you want to use the GUI functionality). The latter is achieved by running the plumber $run command with parameter swagger=TRUE.
Important: The analytical nodes do not have to be R based. A python node running a combination of flask/flasgger would be compatible as well.
The second block is the companion container for running AHUB. This container will take care of ramping up all the sidecar containers of the service stack (nginx as a reverse proxy, certbot for SSL certificates, a reactJS web GUI, etc…) and configures them accordingly.
The third block references the main configuration file for AHUB (see next section) and your previously generated .htpasswd file.
For now you can either leave the demo compose file as is or add/substitute your own container images in the node stack! Please note, that your container image needs to be published in a container registry. If you are using a private registry instead of docker hub, you need to login with your credentials first via „docker login…“ before proceeding with the next steps.
Configuring AHUB
Please inspect the second YAML file in the main folder:
# --------------------------------------------------------------------
# --------------------------------------------------------------------
# AHUB CONFIG FILE
# --------------------------------------------------------------------
# --------------------------------------------------------------------
VERSION: 2.0

# --------------------------------------------------------------------
# TLS / SSL (Encryption)
# --------------------------------------------------------------------
# Currently the following encryption methods are supported
#     self-signed: A self-signed certificate will be created by ahub.
#                  This leads to browser warning, which can be skipped.
#     letsencrypt: AHUB will automatically apply for a certificate from
#                  Let's Encrypt certificate authority. For this to work
#                  you need to deploy AHUB on a public machine and provide
#                  a fully qualified domain name (FQDN).
TLS_TYPE: self-signed

# -- optional -- (for TLS_TYPE: letsencrypt)
#TLS_HOST: myserver.cloud.com # the public domain name (FQDN)
#                               you want to apply the certificate for
#TLS_EMAIL: me@cloud.com # contact email-address

# --------------------------------------------------------------------
# Authentication
# --------------------------------------------------------------------
# Currently the following authentication methods are supported
#     none: Authentication disabled
#     basic: HTTP Basic Authentication with username and password
#     aad: Authentication via Azure Active Directory
# when choosing 'basic' you need to provide a file '.htpasswd' in the main folder.
AUTH_TYPE: basic

(...continues...)
This file contains the configuration for authentication and encryption options. For Basic Authentication with username and password (with your previously generated .htpasswd file) and a self-signed certificate you can leave this as is. Otherwise change the settings according to the description in the config file.
Launching the stack
Before we launch AHUB we need to prepare the docker daemon to run in swarm mode:
> docker swarm init
Swarm initialized: current node (XXX) is now a manager.
The whole stack can be launched by docker in swarm mode with the following command
docker stack deploy -c ./ahub.yaml mystack
This command references the Compose file ahub.yaml to deploy a stack called mystack. Of course you can change the name of your stack to your liking.You should see the following output on the shell:
Creating network mystack_default
Creating secret mystack_htpasswd
Creating config mystack_main_config
Creating service mystack_node2
Creating service mystack_node3
Creating service mystack_boss
Creating service mystack_node1

>
AHUB comes with an instance of Portainer, a very powerful browser-based container management tool. We can start checking if everything ramped up fine, by navigating to http://localhost/portainer/ (the trailing slash is important!!!).
As you are starting this cluster for the first time, you need to set an admin account and then choose the Local mode. After that you get to the Portainer main page, where you can click through the items Services, Containers and what else piques your interest. With Portainer you can do almost anything you can do from the docker command line interface.
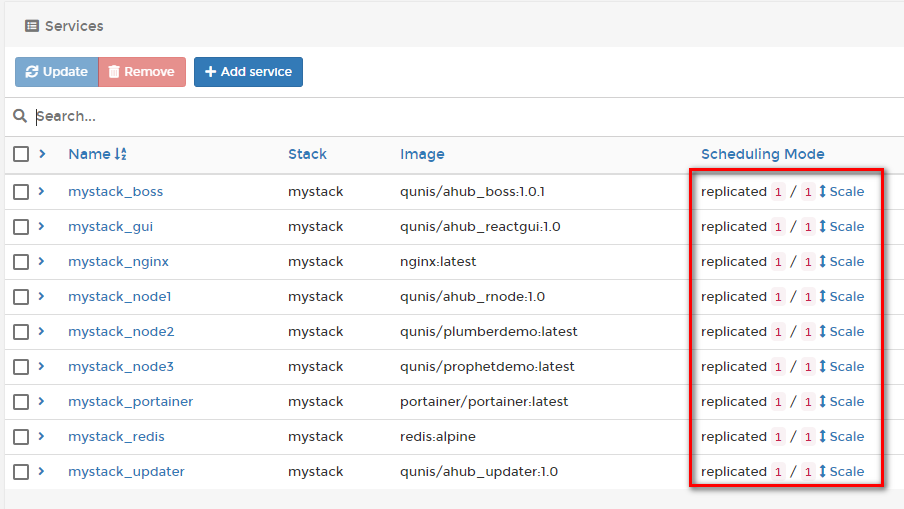
Under the Services tab you should see 9 services if you stuck to the demo file. Three of them being the nodestack comprising of node1, node2 and node3. Everything is fine when you see a 1/1 behind each service.
Checking the API endpoints
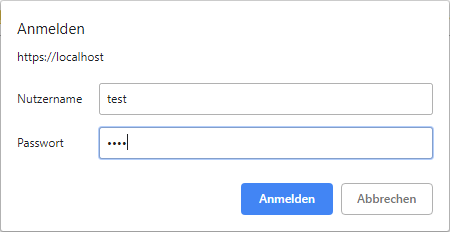
You can now navigate to your API endpoints via https://localhost/<nodename>/<endpoint>?<parameters>. For example https://localhost/node2/plot or https://localhost/node3/?n=24. You will be warned by your browser about the insecure certificate (because we have self-signed it, skip this warning) and be asked for the user credentials you created earlier.
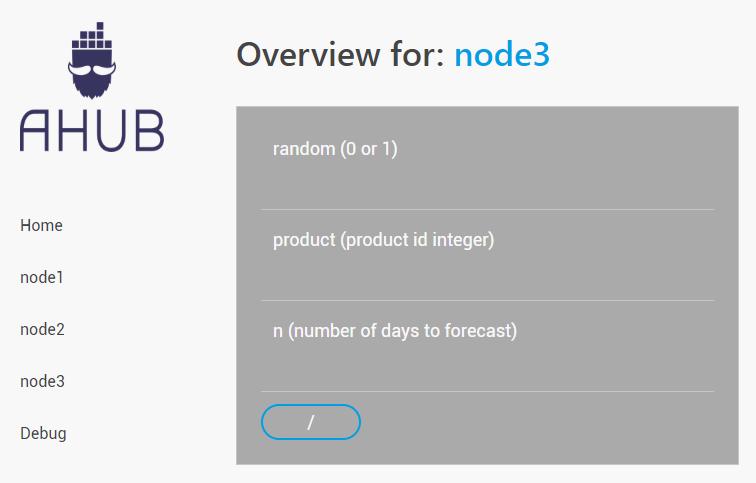
There is also a rudimentary GUI at https://localhost/gui/ (still under development) showing you the various nodes and their endpoints so you can manually trigger a GET request for testing purposes.
Troubleshooting
If something does not work as expected, you can always check the logs of the boss service. You can list all services with the command
docker service ls
Then copy the ID of the boss service and retrieve the logs with
docker service logs <boss id>
I hope you enjoy deploying with AHUB. Please give me a shout over Github if you experience any problems or have any suggestions. I would love to hear from your scenarios.